Showgirl in ColorJacket & Bralette Crochet Set
- Oct 3, 2025
- 11 min read


10/03/2025
Level of difficulty

Sizing: The bralette includes instructions to customize for your measurements. The jacket is written up to size XL, with guidance provided for adjusting to larger or smaller sizes.
Please note: The final fit and drape of this set depends on proper blocking. Be sure to block your pieces as instructed.
Materials
2 skeins Veluna Yarn in colors 5007 and 413 - one skein of each
1 ball Encanto Slim in orange and silver for fringe and embellishments
3.5mm crochet hook
Yarn needle
Scissors
Blocking mat and pins
Beads and sequence if desired for details
Special Stitches
Dc cluster - double crochet cluster: yarn over, insert hook into st, pull up a loop, yarn over and pull through first two loops, yarn over, insert hook into same st, pull up a loop, yarn over and pull through the first two loops, yarn over, pull through all remaining loops.
Picot - ch 3, sl st into the 1st ch you made
Bralette Instructions
The Bralette is made up of geometric pieces that are then sewn together.
Cups for top - make two
Note - Where it says “increase row”, you will do as follows: 2 sc in the first st, sc in each st across, 2 sc in the last st. And where it says “decrease row”, you will do as follows: sc2tog over the first two sts, sc in each st across to the last two sts, sc2tog over the last two sts.
With color 413, ch 3
Row 1: 2 sc in the 2nd ch from the hook, 2 sc in the last ch. Ch 1, turn.
Row 2: 2 sc in first st, 1 sc in next 2 sts, 2 sc in the last st. Ch 1 turn.
Row 3: 1 sc in each st across. Ch 1, turn.
Row 4: Increase row. Ch 1, turn.
Row 5: 1 sc in each st across. Ch 1, turn.
Row 6: Increase row. Ch 1, turn.
Row 7: 1 sc in each st across. Ch 1, turn.
Row 8-9: Increase row. Ch 1, turn.
Row 10: 1 sc in each st across. Ch 1, turn.
Row 11: Increase row. Ch 1, turn.
Row 12: 1 sc in each st across. Ch 1, turn.
Row 13: Increase row. Ch 1, turn.
Row 14: 1 sc in each st across. Ch 1, turn.
Row 15: Increase row. Ch 1, turn.
Row 16: 1 sc in each st across. Ch 1, turn.
Row 17: Increase row. Ch 1, turn.
Row 18: 1 sc in each st across. Ch 1, turn.
Row 19: Increase row. Ch 1, turn.
Row 20-32 : 1 sc in each st across. Ch 1, turn. *Note: If you need a wider cup, you will keep adding rows of sc before working on your decrease rows.
Row 33: Decrease row. Ch 1, turn.
Row 34: 1 sc in each st across. Ch 1, turn.
Row 35: Decrease row. Ch 1, turn.
Row 36: 1 sc in each st across. Ch 1, turn.
Row 37: Decrease row. Ch 1, turn.
Row 38: 1 sc in each st across. Ch 1, turn.
Row 39: Decrease row. Ch 1, turn.
Row 40: 1 sc in each st across. Ch 1, turn.
Row 41: Decrease row. Ch 1, turn.
Row 42: 1 sc in each st across. Ch 1, turn.
Row 43-44: Decrease row. Ch 1, turn.
Row 45: 1 sc in each st across. Ch 1, turn.
Row 46: Decrease row. Ch 1, turn.
Row 47: 1 sc in each st across. Ch 1, turn.
Row 48: Decrease row. Ch 1, turn.
Row 49: 1 sc in each st across. Ch 1, turn.
Row 50: Decrease row. Ch 1, turn.
Row 51: 1 sc in each st across.
Do not finish off. Now turn your work so you are working along the side and ch 1.
Row 1: Sc evenly across into the sides of the rows.
Switch to color 5007, ch 2, turn
Row 2: 1 hdc in the BLO of each st across. Ch 2, turn.
Row 3: 1 hdc in each st across. Ch 2, turn.
Row 4: Hdc dec BLO over the first two sts, 1 hdc BLO in each st across to the last two sts, hdc dec over the last two sts. Ch 2, turn.
Row 5: 1 hdc in each st across. Ch 2, turn.
Row 6: Hdc dec BLO over the first two sts, 1 hdc BLO in each st across to the last two sts, hdc dec over the last two sts. Ch 2, turn.
*Note: If you need to add more height to your cup, keep repeating the sequence of Row 5 and 6 before moving on to the final row.
Switch to color 413 - you are going to work your final round by working along the side, then bottom, the other side, then along the top.
Round 1: Ch 2, hdc evenly down the side and around the entire piece.
Finish off - repeat for other cup.
Now place both cups right sides together and whip stitch up the middle.


Triangle in between cups
With color 5007, ch 3
Row 1: 3 hdc in the first ch of the ch 3 you made. Ch 2, turn.
Row 2: 2 hdc in the first st, 1 hdc in the next st, 2 hdc in the last st. Ch 2, turn.
Row 3-5: 2 hdc in the first st, 1 hdc in each st across until 1 st remains, 2 hdc in the last st. Ch 2, turn.
Row 6-7: 3 hdc in the first st, 1 hdc in each st across until 1 st remains, 3 hdc in the last st. Ch 2, turn.
Row 8: 2 hdc in the first st, 1 hdc in each st across until 1 st remains, 2 hdc in the last st. Ch 2, turn.
Row 9: 1 hdc in each st across. Finish off.
Sew the triangle in between the cups.
Side triangles for each side of cups
With color 5007, ch 3
Row 1: 2 hdc in the 3rd ch from the hook. Ch 2, turn.
Row 2: 2 hdc in the first st, 1 hdc in the last st. Ch 2, turn.
Row 3: 1 hdc in each st until one st remains, 2 hdc in the last st. Ch 2, turn.
Row 4: 2 hdc in the first st, 1 hdc in each st to the end. Ch 2, turn.
Row 5: 1 hdc in each st until one st remains, 2 hdc in the last st. Ch 2, turn.
Row 6: 2 hdc in the first st, 1 hdc in each st to the end. Ch 2, turn.
Row 7: 1 hdc in each st until one st remains, 2 hdc in the last st. Ch 2, turn.
Row 8: 2 hdc in the first st, 1 hdc in each st to the end. Ch 2, turn.
Row 9: 1 hdc in each st until one st remains, 2 hdc in the last st. Finish off.
Sew on triangles.
Attach color 5007 in the top left hand corner of the piece - right side facing you.
Round 1: Sc evenly around the entire piece. Join with a sl st to the first sc. Ch 2.
Round 2: Hdc down the side, dc in each st along the bottom, hdc up the other side, and hdc evenly along the top. Join with a sl st to the first hdc.

Back Ties
Attach color 5007 in the top left hand corner of the piece, ch 3.
Row 1: 1 dc evenly across the side. Ch 3, turn.
Row 2: 1 dc in each st across. Ch 3, turn.
Row 3: Dc dec, dc across to the last two sts, dc dec. Ch 3, turn.
Keep decreasing until you have 20 sts remaining
Final Row : ch 6, sk 1, dc in next three, ch 2, sk 2, dc in next three, repeat across….ch 2, sk 1, dc in top of turning ch.
Repeat on the other side.
Ch 200 and use this for the lace up back.
Jacket Instructions
Pattern repeat is for a multiple of 5 plus 2
Front Panels - make two
S (M, L, XL)
With 5007, ch 42 (52, 62, 72)
Row 1: 1 sc in the 2nd ch from the hook, 1 sc in each st across. Ch 1, turn.
Row 2: 1 sc in the first two sts, *ch 5, sk the next 2 sts, 1 sc in each of the next 3 sts; repeat until the last 4 sts remain, ch 5, sk the next 2 sts, 1 sc in each of the last 2 sts. Ch 1, turn.
Row 3: 1 sc in the first sc, sk the next sc, *5 sc in the next ch-5 sp, sk the next sc, sc in the next sc, sk the next sc; repeat until the last 2 sts remain, sk the next sc, 1 sc in the last sc. Turn.
Row 4: Ch 6 (count as tr and chain 2), sk the first 2 sc, *1 sc in each of the next 3 sc, ch 5, sk the next 3 sc; repeat until the last 2 sts remain, ch 2, sk the next sc, 1 tr in last sc. Ch 1, turn.
Row 5: 1 sc in the first sc, 2 sc in the ch-2 sp, *sk the next sc, 1 sc in the next sc, sk the next sc, 5 sc in the ch-5 sp; repeat until the last ch-5 sp, sk next sc, sc in next sc, sk next sc, 2 sc in the ch-6 sp, 1 sc in the 4th ch of the beginning ch 6. Ch 1, turn.
Row 6: 1 sc in the first two sts, *ch 5, sk the next 3 sc, 1 sc in each of the next 3 sc; repeat until the last 5 sts remain, ch 5, sk the next 3 sc, 1 sc in the last 2 sc. Ch 1, turn.
Repeat Rows 3-6 until you have your designed length. I recommend ending on a Row 5 because this row gives it a cleaner look.
For the example pattern - I had 26 of the completed rows of the honeycomb stitch (rows with circles).
Do not finish off.
Ch 2, turn, 1 hdc in the first three sts, sk 1 st, hdc in the next 5 sts, sk 1 st, repeat from * across, ended with hdc in the last 3 sts.
Turn your work so you are working along the side of the panel. Place two more hdc in the last st you were in. Hdc evenly down the side of the panel. Place 3 hdc in the bottom corner. Hdc in each st along the bottom. 3 hdc in the corner. Hdc evenly along the other side of the panel.
BLOCK YOUR FRONT PANELS.

Back Panel
S (M, L, XL)
With 5007, ch 92 (117, 137, 162)
Row 1: 1 sc in the 2nd ch from the hook, 1 sc in each st across. Ch 1, turn..
Row 2: 1 sc in the first two sts, *ch 5, sk the next 2 sts, 1 sc in each of the next 3 sts; repeat until the last 4 sts remain, ch 5, sk the next 2 sts, 1 sc in each of the last 2 sts. Ch 1, turn.
Row 3: 1 sc in the first sc, sk the next sc, *5 sc in the next ch-5 sp, sk the next sc, sc in the next sc, sk the next sc; repeat until the last 2 sts remain, sk the next sc, 1 sc in the last sc. Turn.
Row 4: Ch 6 (count as tr and chain 2), sk the first 2 sc, *1 sc in each of the next 3 sc, ch 5, sk the next 3 sc; repeat until the last 2 sts remain, ch 2, sk the next sc, 1 tr in last sc. Ch 1, turn.
Row 5: 1 sc in the first sc, 2 sc in the ch-2 sp, *sk the next sc, 1 sc in the next sc, sk the next sc, 5 sc in the ch-5 sp; repeat until the last ch-5 sp, sk next sc, sc in next sc, sk next sc, 2 sc in the ch-6 sp, 1 sc in the 4th ch of the beginning ch 6. Ch 1, turn.
Row 6: 1 sc in the first two sts, *ch 5, sk the next 3 sc, 1 sc in each of the next 3 sc; repeat until the last 5 sts remain, ch 5, sk the next 3 sc, 1 sc in the last 2 sc. Ch 1, turn.
Repeat Rows 3-6 until you have your designed length. I recommend ending on a Row 5 because this row gives it a cleaner look.
For the example pattern - I had 26 of the completed rows of the honeycomb stitch (rows with circles).
Do not finish off.
Ch 2, turn, 1 hdc in the first three sts, sk 1 st, hdc in the next 5 sts, sk 1 st, repeat from * across, ended with hdc in the last 3 sts.
Turn your work so you are working along the side of the back panel. Place two more hdc in the last st you were in. Hdc evenly down the side of the panel. Place 3 hdc in the bottom corner. Hdc in each st along the bottom. 3 hdc in the corner. Hdc evenly along the other side of the panel.
BLOCK YOUR BACK PANEL - be sure to block to same size as front panels.
Assembly: Sew front panels onto back panel. Leave some space for the neck gap as well as for the arm holes.
With color 413, attach your yarn in any st and ch 2. Make two rows of hdc evenly around the entire piece, and then 1 row of hdc around each arm hole.
Cap Sleeve - Make 2
With color 413, start with a magic circle, 12 sc in the magic circle. Pull tight, join with a sl st to the first sc.
Row 1: Ch 5, sk 1, dc cluster in the next st, ch 3, dc cluster in the next st, repeat from * 4 more times for a total of 6 clusters. End with a ch 2, 1 dc in the next st. Turn.
Row 2: Ch 5, sc in the top of the next dc cluster, ch 1, sc in ch-3 sp, picot, ch 1, sc in the next dc cluster, ch 5 repeat from * one more time. Sc in the top of the next dc cluster, ch 1, sc in ch-3 sp, picot, ch 1, sc in the next dc cluster, ch 2, 1 dc in the 4th ch of the beginning ch. Turn.
Row 3: Ch 5, 3 dc in ch 2 sp, ch 5, 6 dc in ch-5 sp, ch 5, 6 dc in ch-5 sp, ch 5, 4 dc in the last ch-5 sp. Turn.
Row 4: Ch 6, sk the first dc, 1 dc in the next dc, ch 1, 1 dc in the next dc, ch 1, 1 dc in the next dc, ch 3, dc cluster in the ch-5 sp, ch 3, [dc in the next dc, ch 1] 6 times, ch 2, dc cluster in ch-5 sp, ch 3, repeat from * one more time. Dc in the next dc, ch 1, dc in the next dc, ch 1, dc in the next dc, ch 1, dc in the 4th ch on the beginning ch 5. Turn.
Row 5: Ch 2, 1 sc in the ch-1 sp, [ch 3, sc in the next ch-1 sp] twice, ch 3, [dc cluster, ch 2, dc cluster] in next dc cluster, [ch 3, sc in next ch-1 sp] 5 times, ch 3, [dc cluster, ch 2, dc cluster] in next dc cluster, [ch 3, sc in next ch-1 sp] 5 times, ch 3, [dc cluster, ch 2, dc cluster] in next dc cluster, [ch 3, sc in next ch-1 sp] 2 times, ch 3, 1 sc in the ch-5 sp. Turn.
Row 6: Ch 5, 1 sc in ch-3 sp, ch 3, 1 sc in the next ch-3 sp, ch 3, dc cluster in the next dc cluster, ch 5, sc in ch-2 sp between clusters, ch 5, dc cluster in next dc cluster, ch 3, sk ch-3 sp, sc in next ch-3 sp, [ch 3, sc in next ch-3 sp] 3 times, ch 3, dc cluster in the next dc cluster, ch 5, sc in ch-2 sp between clusters, ch 5, dc cluster in next dc cluster, ch 3, sk ch-3 sp, sc in next ch-3 sp, [ch 3, sc in next ch-3 sp] 3 times, ch 3, dc cluster in the next dc cluster, ch 5, sc in ch-2 sp between clusters, ch 5, dc cluster in next dc cluster, ch 3, sk ch-3 sp, sc in next ch-3 sp, ch 3, sc in next ch-3 sp, ch 1, dc in last sc. Finish off.
Block pieces before sewing on to sleeves.

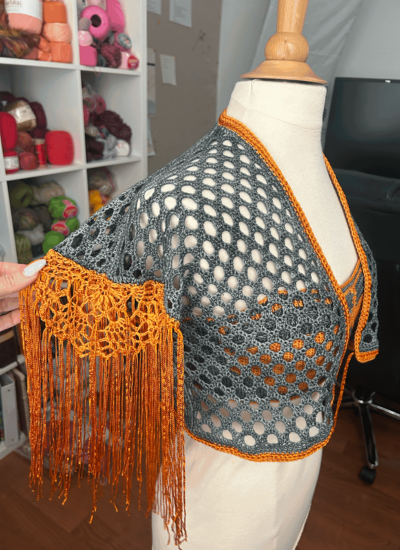
Cut long strands of Encanto Slim Yarn and attach them to the sleeves.
Sew on beads and sequence to elevate the look.
Use Encanto yarn to add depth to the overall look.

Designer: Hands of Zeal Crochet
Disclaimer: measurements are approximate due to differences between centimeters and inches, needle sizes and tension. All care has been taken to allow accurate completion of the pattern.
See more about...


Comments